


FLOORMOSA
Trim Pieces
Trim Pieces
Regular price
$0.00
Regular price
Sale price
$0.00
Unit price
per
Please let us know what trim you are looking for and we will provide the availability and pricing.
Trim Options
-
Threshold - This molding is used at exterior doorways as a transition between flooring and the doorway threshold. It can also be used to transition a wood floor to different floor types to make them fit together perfectly, such as a high pile carpeting or tile. Another typical use for a threshold is to conceal the expansion space between the flooring and a vertical surface such as fireplaces, hearths and sliding glass doors.
 Installation: Lay threshold molding in place to determine a proper fit. The threshold molding should overlap the flooring by 1/2" to 3/4" leaving the balance for expansion. To attach the threshold, nail into the subfloor behind the lip of the molding. Be sure when nailing not to obstruct the floors expansion space.
-
T-Molding - Doorway molding used to join two wood floors or floors of the same height such as ceramic tile, hardwood, or laminate, in adjoining rooms. T-Molding are also used to provide expansion joints when a floor dimension exceeds the length or width of 40'.
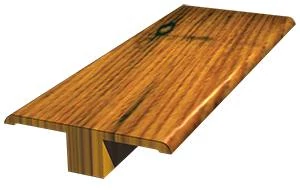
-
Installation: A space of 1 1/4" between the two adjoining floors is necessary to properly install the molding. This is to allow for the expansion space. Lay the T-Molding in place to determine proper fit. To attach the T-Molding between a ceramic tile floor and the hardwood floor, apply a 1/4" bead of construction adhesive to the top edge of the ceramic tile. To attach between two hardwood floors apply the 1/4" bead to the top edge of of one side of the hardwood only. Seat the molding in place allowing for a minimum of 1/4" overlap on the wood flooring. Make sure to allow for the expansion space between the T-Molding and the tile. When installing over a wood sub-floor, use finish nails to secure the T-Mold. When installing over concrete, use a heavy-duty construction adhesive to secure T-Mold.
-
Quarter Round - This molding, which is similar to shoemold, conceals the required expansion space between the wall/wall base and the hardwood flooring. It is also sometimes used under cabinets and toe kicks where a wall base won't fit or at the base of the stairs to provide a subtle blend between the floor and the wall or vertical surface.
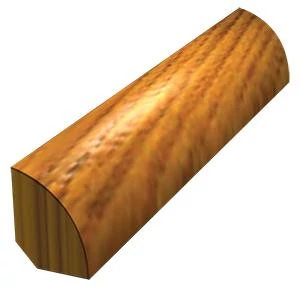
-
Installation: Secure the quarter round using a finishing nail and always attach to the wall to allow for proper expansion and contraction of the floor. Be sure when nailing, that you do not go at a downward angle so as to avoid hitting the flooring and causing it to get into a bind.
-
Flush Stairnose - Provides the proper transitions for stairways or steps which have hardwood floors that have been installed by either the nail down or glue down installation method. The Stair Nose also provides the proper overhang for a transition from one floor to the next such as the step into a sunken living room.
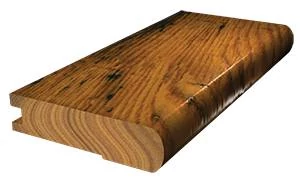
-
Installation: When used on a stair step, the Stair Nose molding should cover and overlap the riser. When used on a step-up to another room, the Stair Nose molding becomes the starting "edge" of the floor. Because of the interlocking of the molding with the floor, the Stair Nose molding should be installed first. Once the molding is in place, the interlocking floor can be installed. Moldings should be installed using adhesive and screw type fasteners or nails.
-
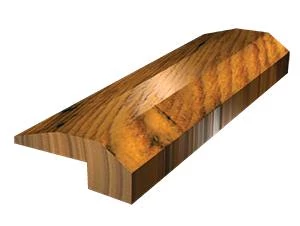
Flush Reducer - Used to join hardwood floors that have been glued down or nailed down to transition with floors of different heights such as vinyl, ceramic tile, or low-pile carpeting.
-
Installation: To attach molding pre-drill and nail in appropriate 6" to 8" inch intervals. Do not nail less than 2" - 3" from the ends of either side. To attach molding using glue, apply glue to the front edge of the molding. Apply one or two 1/4" beads of construction adhesive to the sub-floor and seat the molding in place.
-
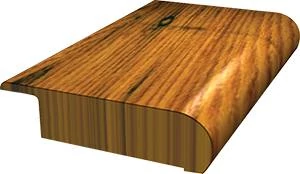
Overlap Stairnose - (Floating Method Only) provides the proper transition for stairways or steps, which have hardwood floors that have been installed using the floating installation method. The Stair Nose also provides the proper overhang for a transition from one floor level to the next such as a step into a sunken living room.
-
Installation: To attach molding, pre-drill and nail in appropriate 6" to 8" inch intervals. Do not nail less than 2" - 3" from the ends of either side. Also apply glue to the front edge of the molding. Apply one or two 1/4" beads of construction adhesive to the subfloor and seat the molding in place. All stair nose moldings should be nailed and glued to secure the molding adequately. It is important not to attach the reducer directly to the floating floor to allow expansion and contraction.
-
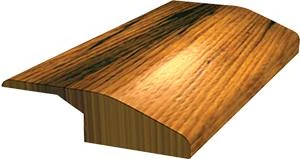
Overlap Reducer - (Floating Method Only) Used to join hardwood floors that utilize the floating installation method with floors of different heights such as vinyl, ceramic tile, or low pile carpeting.
- Installation: To attach molding pre-drill and nail in appropriate 6" to 8" intervals. Do not nail less than 2" - 3" from the ends of either side. To attach the molding using glue, apply glue to the front edge of the molding. Apply one or two 1/4" beads of construction adhesive to the subfloor and seat the molding in place. It is important not to attach the reducer directly to the floating floor to allow for expansion and contraction.
Accessories: Trim, Transitions, Moldings, Pad, Stair Treads and more are available upon request.


